Configuring Virtual Machines Using Desired State Configuration - Part 5 - Creating a Pull Service
Hello and welcome to an article on how to create your own Powershell DSC Pull Service. This is the fifth article of the series and things are starting to build our own DSC infrastructure.
To configure the DSC Pull Service we are going to need a windows server machine running at least Powershell v5 and a certifite. For the purpose of this post, I've created a dedicated machine and the certificate that I'm going to use is issued by my Active Directory Certificate Services.
What would be the easiest way to create a Pull Service? DSC of course. We are going to push a DSC configuration to our machine that is going to convert it to a DSC Pull Service!
First off, we're going to need that certificate installed in the Personal container of the machine. I prefer using my CA to issue certificates since it is trusted by all the domain member machines and for this one I've enrolled for a certificate based on the Web Server template:

You can use any web server certificate as long as it is trusted by your machines and fit for a web server. We are going to need the thumbprint of the certificate, so use the below command to get it:

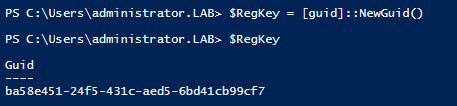
We are also going to need a guid so create a variable just like below:
Below is the DSC configuration file that is going to turn our server into a pull service:
1 2 3 4 5 6 7 8 9 10 11 12 13 14 15 16 17 18 19 20 21 22 23 24 25 26 27 28 29 30 31 32 33 34 35 36 37 38 39 40 41 42 43 44 45 46 47 48 49 50 51 | configuration PullService
{
param
(
[string[]]$NodeName = 'localhost',
[ValidateNotNullOrEmpty()]
[string] $certificateThumbPrint,
[Parameter(HelpMessage='This should be a string with enough entropy (randomness) to protect the registration of clients to the pull server. We will use new GUID by default.')]
[ValidateNotNullOrEmpty()]
[string] $RegistrationKey # A guid that clients use to initiate conversation with pull server
)
Import-DSCResource -ModuleName PSDesiredStateConfiguration
Import-DSCResource -ModuleName xPSDesiredStateConfiguration
Node $NodeName
{
WindowsFeature DSCServiceFeature
{
Ensure = "Present"
Name = "DSC-Service"
}
xDscWebService PSDSCPullServer
{
Ensure = "Present"
EndpointName = "PSDSCPullServer"
Port = 443
PhysicalPath = "$env:SystemDrive\inetpub\PSDSCPullServer"
CertificateThumbPrint = $certificateThumbPrint
ModulePath = "$env:PROGRAMFILES\WindowsPowerShell\DscService\Modules"
ConfigurationPath = "$env:PROGRAMFILES\WindowsPowerShell\DscService\Configuration"
State = "Started"
DependsOn = "[WindowsFeature]DSCServiceFeature"
RegistrationKeyPath = "$env:PROGRAMFILES\WindowsPowerShell\DscService"
AcceptSelfSignedCertificates = $true
UseSecurityBestPractices = $true
Enable32BitAppOnWin64 = $false
}
File RegistrationKeyFile
{
Ensure = 'Present'
Type = 'File'
DestinationPath = "$env:ProgramFiles\WindowsPowerShell\DscService\RegistrationKeys.txt"
Contents = $RegistrationKey
}
}
}
|
Apart from the PSDesiredStateConfiguration module that is available by default, we're going to need the xPSDesiredStateConfiguration as well. If your machine has internet access you can install it directly from the PSGallery just like any other module. If not, you can download the module files and place them in the C:\Program Files\WindowsPowerShell\Modules directory.
In case you are using a new installation of Windows Server and trying to install the module from the PSGallery, you may run into issues related to TLS. The below command will configure the TLS settings on your machine:
[Net.ServicePointManager]::SecurityProtocol = [Net.SecurityProtocolType]::Tls12
Note the last resource in the above configuration. It is a "File" resource that creates a file in the DSC program files folder and saves the registration key in it in case you lose it.
Just like with any other configuration, we have to load and compile it using the certificate thumbprint and the registration key:

When the configuration is successfully compiled, we apply it using the Start-DscConfiguration cmdlet. The output should be similar to the below:

At this point, you should be having a full working DSC Pull Service. The next step would be to upload a configuration.
To publish a configuration we need two files, the MOF file and a checksum file. The MOF file is the compiled configuration and the checksum file is a file that contains the hash of the MOF file. This helps clients ensure that the configuration they are about to apply is valid and later on compare their own with the one on the server to check for updates.
Going back to the WebApp001 configuration we've prepared in the previous articles, we're going to load, compile it and create the checksum file:

Now we have to copy the folder to the root of the Pull Service published directory. This is the "ConfigurationPath" setting of the Pull Service configuration above.
The last step would be to configure a node to get its configuration from the Pull Service. We just have to push a LCM configuration to the node with the right properties, like the one below:
1 2 3 4 5 6 7 8 9 10 11 12 13 14 15 16 17 18 19 20 21 22 23 24 25 26 27 28 29 | [DSCLocalConfigurationManager()]
configuration DSCClient
{
param
(
[ValidateNotNullOrEmpty()]
[string] $NodeName = 'localhost',
[ValidateNotNullOrEmpty()]
[string] $RegistrationKey
)
Node $NodeName {
Settings{
RefreshMode = 'Pull'
}
ConfigurationRepositoryWeb LAB-DSC {
ServerURL = "https://dsc.lab.local:443/PSDSCPullServer.svc"
RegistrationKey = $RegistrationKey
ConfigurationNames = @('WebApp001')
}
ReportServerWeb LAB-DSC {
ServerURL = "https://dsc.lab.local:443/PSDSCPullServer.svc"
RegistrationKey = $RegistrationKey
}
}
}
|
The LCM configuration contains settings to set the RefreshMode to "Pull", the URLs of the server, the registration key to use and the name of the configuration to get. Setting the LCM configuration on the node would look just like the below:

Now that the node is configured to download its configuration from the server, the status of the configuration should be something similar to:

From this point on, the node will apply the configuration according to the LCM schedule. If you want to apply it straight away, you can use the Start-DscConfiguration cmdlet using the -UseExisting parameter:

The above configuration will use the Windows Pull Server using MDB/ESENT database to store the service data. This setup can serve up to 500 nodes, if you have more nodes to manage you should use Microsoft SQL or switch to Azure Automation.
All the configuration files used in this port are available in my Github repository here.
In the next article, we're going to create and configure an Azure Automation Account and register our machines to it to get their configurations. Stay tuned!


