Posts

How to query Azure APIs using PowerShell

Image
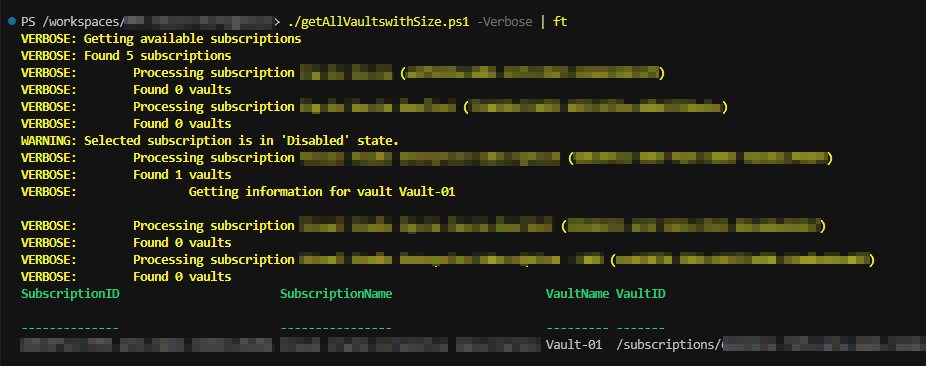
Azure REST APIs are a great way to manage your Azure resources. You can use them to create, update, delete, and list resources, as well as get information about them. In many cases, the tools provided by Microsoft - like Azure CLI and Azure PowerShell, do not provide the functionality you need and thus you have to turn to the APIs. As an example, we're going to create a script that will get the size of the storage consumed by Recovery Services Vaults, that is available in Azure Portal but not in the command line tools. So If you have a lot of vaults and you need the size of the storage behind them, you need to automate the process using the Azure APIs. Below is the entire script, but don't dive right in, let's take it a step at a time! 1 2 3 4 5 6 7 8 9 10 11 12 13 14 15 16 17 18 19 20 21 22 23 24 25 26 27 28 29 30 31 32 33 34 35 36 37 38 39 40 41 42 43 44 45 46 47 48 49 50 51 52 53 54 55 56 57 58 59 60 61 62 63 64 65 66 67 68 69 70 71 72 73 74 75 76 77 78 79 8

Creating Unique Names for Resources in Bicep

Image
When creating resources on Azure, there are times that the deployment fails due to the name selected for the resource. This is primarily due to the fact that there are some resources that are available as services and exposed to the internet, thus their name should be unique across deployments.  Take a storage account for example. The name should not only be unique but also in lowercase and under 25 characters! A virtual machine, on the other hand, does not require a unique name (at a global level). How do we tackle such requirements? The Bicep uniqueString function is here to help. This particular function takes a number of string parameters and creates a unique string. Combined with scope functions like subscription and resourceGroup , you may generate strings unique to your environment. Other string functions like toLower  and substring  can be used to make your code even more robust. Let's dive into some examples! The below code is part of a bicep file that deploys a storage

Controlling Network Access in AKS using Network Policies

Image
One of the very first problems when starting to deploy workloads in Azure Kubernetes Service is the segregation of the network. By default, all pods are part of the same network and can communicate with each other. In the majority of the cases, however, we want to restrict network access between pods, namespaces, applications, etc. Fortunately, K8s provide a way to easily control network traffic, called Network Policies . There are two types of policies that can be applied to a pod, Ingress and Egress. Ingress-type policies control the traffic inbound to the pod, whilst egress control the traffic outbound from a pod. In this post, we're going to work only with ingress-type policies since the configuration and principles are pretty much the same, it's just the direction that changes. To demonstrate the use of policies, we are going to be using three namespaces and each namespace will contain a deployment with containers that respond to ping requests and also contain the ping uti

Protecting AppService using Front Door

Image
Starting with the fact that every web application should be protected by a Web Application Firewall (WAF) and accelerated using a Content Delivery Network (CDN), combined with the simplicity of the deployment of the Azure Front Door service, gives you no excuses for not protecting your apps! In this blog post, we're going to deploy an AppService and protect it using Azure Front Door. For the purposes of this demo, we're going to use the NodeJS - RequestInformation app that is available in my Github repo over  here . This application provides information on the platform and incoming requests that is going to be very handy later on. To deploy the demo resources, you just have to clone this repository, change to the  FrontDoor-AppServiceBackend-001/101-Bicep-Templates/900-IaC-FullDeployment-001 directory, and execute the deploy.sh script. The script will create a subscription-level deployment that will deploy an AppService (including the plan) and an Azure Front Door. Make sur

Running Multiple NGINX Ingress Controllers in AKS

Image
In some of the previous articles of this blog, we went through the process of installing NGINX as the Ingress Controller in AKS clusters. Either for applications that should be available directly from the public internet, or for applications that should only be accessed from networks considered internal. In the majority of the cases, however, and given that an AKS cluster is an environment that is designed to host multiple applications and provide economy at scale, additional ingress controllers may be required. In this post, we're going to go through the process of deploying an additional NGINX ingress controller that is going to be used for internal applications. The below diagram depicts the desired outcome: The Angular application is published via the public NGINX through the Azure Load Balancer that has been assigned a public IP. The .NET app is published by a different set of NGINX pods that are deployed in a different namespace and their ingress controller service is connect

Publishing AKS services to private networks using NGINX

Image
In one of the previous posts, we used NGINX as the ingress controller in Azure Kubernetes Service, to publish applications and services running in the cluster (article is available here ). In that deployment, NGINX was using a public IP for the ingress service, something that may not be suitable for services that should be kept private or protected by another solution. In today's post, we're going to deploy NGINX in a way that the ingress service uses a private IP, from the same vNet that the cluster is built on top. Following the usual steps of logging in and selecting the subscription to use in Azure CLI, you just have to execute the deployment script that will deploy the main.bicep file and all of its sub-resources to create the AKS platform on Azure. The next step would be to get the credentials for the cluster using the  az aks get-credentials command, as shown in the getAKSCredentials.sh  script, in order to connect with using the kubectl tool. If you get the services t

Upload your image on Azure Container Registry

Image
In my previous article , we went through the process of uploading our own image to Docker Hub. Even though it's perfectly fine to use Docker Hub, some organizations prefer using their own registries, either due to additional functionality that they might offer or due to policies and regulations. Since Azure offers a container registry resource that would fit most use cases, I thought we could try to upload some images and at least use it for test and dev purposes!  First things first, the tools we're going to need. To upload an image to an ACR we need: 1. An Azure Container Registry 2. Docker Desktop 3. Azure CLI Starting from the top of the list, we need the ACR resource to which we're going to upload the images. Clone my Github bicep repository and switch to the  ContainerRegistry-ImageUpload-001/110-Bicep/110-AzureContainerRegistry/ folder. Update the parameters in the deploy script and submit the deployment. The output should be similar to the below: If everything goe