Creating Self Signed Root and Server Certificates
Certificates are a requirement for almost all communications in order to be secure. The purpose of this article it to describe the process of creating a Root CA certificate and then a Server certificate signed by the first. This is very useful when developing or testing an application and you do not have a CA set up or budget to buy a certificate.
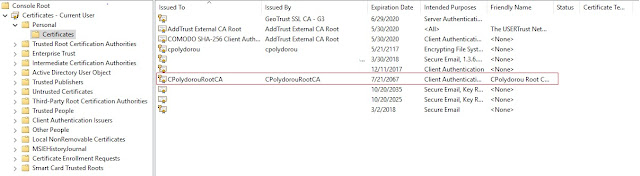
The following command will create a Root CA certificate in the Personal folder of the current user certificate store.
The CA name is going to be "CPolydorou Root CA" and the certificate is going to be valid for the next fifty years.
Now that we have created the root certificate, we are going to export it to two different formats, CER and PFX. The .cer file is going to be imported to the client computers and we are going to keep the .pfx as a backup.
The "Export-Certificate" cmdlet will export the certificate to a file.
Since the pfx file has to be protected by a password, we are going to create a secure string first, and then export the certificate using the "Export-PfxCertificate" cmdlet.
Now that we've created the Root CA certificate, let's create a server certificate and sign it with it..
If you have just created the Root CA certificate, the certificate is already stored in the "$RootCert" variable. If not, you have to load it using the below commands after replacing the thumbprint with the thumbprint of your certificate:
The below command will create the server certificate.
When executed, the new certificate is installed in the Personal folder of the current user's certificate store.
The export commands can also be used in order to export this certificate also:
The next step would be to import the Root CA certificate on your servers and clients using the command:
and import the server certificate on the servers using the command:
Please note that the makecert.exe utility is required by the above cmdlets so make sure you have installed the Windows 10/8 SDK or Visual Studio with the necessary features.
Moreover, the last two commands import the certificate into the Computer store, thus an elevated PowerShell console is required.
The following command will create a Root CA certificate in the Personal folder of the current user certificate store.
$RootCert = New-SelfSignedCertificate -DnsName "CPolydorou Root CA" `
                          -CertStoreLocation "Cert:\CurrentUser\My" `
                          -KeyLength 4096 `
                          -KeyUsageProperty All `
                          -KeyUsage CertSign,CRLSign,DigitalSignature `
                          -KeyExportPolicy Exportable `
                          -KeyAlgorithm RSA `
                          -FriendlyName "CPolydorou Root Certification Authority Certificate" `
                          -HashAlgorithm SHA512 `
                          -NotBefore ([DateTime]::Now) `
                          -NotAfter ([DateTime]::Now.AddYears(50)) `
                          -Subject "CN=CPolydorouRootCA"
The CA name is going to be "CPolydorou Root CA" and the certificate is going to be valid for the next fifty years.

Now that we have created the root certificate, we are going to export it to two different formats, CER and PFX. The .cer file is going to be imported to the client computers and we are going to keep the .pfx as a backup.
The "Export-Certificate" cmdlet will export the certificate to a file.
Export-Certificate -Cert $RootCert `
                   -FilePath "RootCACertificate.cer"
Since the pfx file has to be protected by a password, we are going to create a secure string first, and then export the certificate using the "Export-PfxCertificate" cmdlet.
$Password = ConvertTo-SecureString -String "pass" `
                                   -AsPlainText `
                                   -Force

Export-PfxCertificate -Cert $RootCert `
                      -Password $Password `
                      -FilePath "RootCACertificate.pfx"
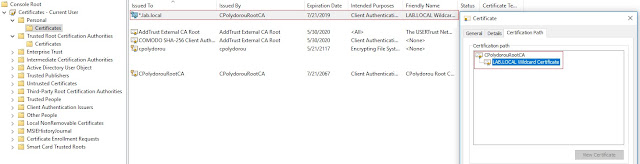
Now that we've created the Root CA certificate, let's create a server certificate and sign it with it..
If you have just created the Root CA certificate, the certificate is already stored in the "$RootCert" variable. If not, you have to load it using the below commands after replacing the thumbprint with the thumbprint of your certificate:
$thumbprint = "5EC86F0CA93FFA68F22114EDF3AFEF1688C83049"
$RootCert = Get-ChildItem -Path "Cert:\CurrentUser\My\$thumbprint"
The below command will create the server certificate.
$Cert = New-SelfSignedCertificate -Subject *.lab.local `
                                  -DnsName *.lab.local,testing.local `
                                  -CertStoreLocation "Cert:\CurrentUser\My" `
                                  -KeyUsage DigitalSignature `
                                  -KeyExportPolicy Exportable `
                                  -KeyUsageProperty All `
                                  -KeyLength 4096 `
                                  -KeyAlgorithm RSA `
                                  -FriendlyName "LAB.LOCAL Wildcard Certificate" `
                                  -HashAlgorithm SHA512 `
                                  -NotBefore ([DateTime]::Now) `
                                  -NotAfter ([DateTime]::Now.AddYears(2)) `
                                  -Signer $RootCert
When executed, the new certificate is installed in the Personal folder of the current user's certificate store.

The export commands can also be used in order to export this certificate also:
Export-Certificate -Cert $Cert `
                   -FilePath "ServerCertificate.cer"

Export-PfxCertificate -Cert $Cert `
                      -Password $Password `
                      -FilePath "ServerCertificate.pfx"
The next step would be to import the Root CA certificate on your servers and clients using the command:
Import-Certificate -FilePath "RootCACertificate.cer" `
                   -CertStoreLocation "Cert:\LocalMachine\Root" `
                   -Confirm:$false
and import the server certificate on the servers using the command:
Import-PfxCertificate -FilePath "ServerCertificate.pfx" `
                      -CertStoreLocation "Cert:\LocalMachine\My" `
                      -Exportable:$true `
                      -Password $Password `
                      -Confirm:$false
Please note that the makecert.exe utility is required by the above cmdlets so make sure you have installed the Windows 10/8 SDK or Visual Studio with the necessary features.
Moreover, the last two commands import the certificate into the Computer store, thus an elevated PowerShell console is required.

