How to deploy Bicep templates using Azure DevOps Pipelines
In this article, I'm going to walk you through submitting Azure Deployments using Bicep files from Azure DevOps. Unfortunately, up until now, there is no official task for this need, so we are going to use Azure CLI instead.
We'll start with creating a new pipeline, so open your project in Azure DevOps, switch to the Pipelines view, and hit the new pipeline button. We're going to use the classic edition for this demo, so go for the Use the classic editor option at the bottom.
The first step of a build pipeline is to select the source that contains your code. For this, I've created a Git repository in the same project that contains a bicep file and looks like this:
By default, the source repository is going to be set to Azure DevOps, which is fine for our case:
Moving on to the next step, we're presented with some template options for the pipeline. We'll start with an empty pipeline that we'll build ourselves so click the Empty Job option.
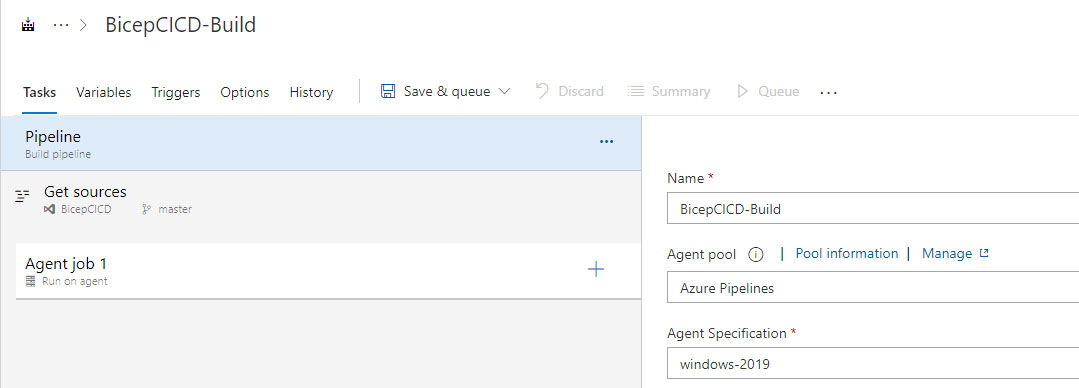
The next screen is the place where we configure the pipeline and its steps:
The first step of the pipeline is to get the source files. The agent will clone the repository so that we can build our artifacts and deploy any resources.
The first agent job is created by the system and contains no steps. Click on the plus icon to add the first step. The next screen contains all the available steps that can be added to the pipeline. Type Azure CLI in the search box and then Add to add it to the pipeline steps:
We now have to configure the settings for this task. The first one is the connection to the subscription that we'll use. I've you have previously connected to a subscription from this DevOps project, it should show up in the drop-down box. If not, you should click the Manage button and go through the wizard to authorize this project to access your Azure subscription.Next is the Script Location. This can be either an inline script or a script that is saved in the repository. You could do both, I've decided to use an inline script since it's only a couple of lines.
The first line submits the deployment and saves the result in a variable. This variable is then used to set a pipeline variable so that we have the outputs of the bicep template and the results of the deployment available in the next steps of the pipeline in case we need it:
$result = az deployment sub create --location westeurope --template-file main.bicep

Write-Output("##vso[task.setvariable variable=bicepDeploymentOutputs;]$result")
The last thing to notice is the path to the bicep file, as it is used in the script. I've configured the working path to be the directory where the file is saved using the Working Directory option, so I just use its name.
After filling in all the settings you should end up with something similar to the below:
The YAML code for this step would be:steps: - task: AzureCLI@2 displayName: 'Deploy Bicep Template' inputs: azureSubscription: 'Visual Studio Enterprise Subscription (********-****-****-****-******)' scriptType: pscore scriptLocation: inlineScript inlineScript: | $result = az deployment sub create --location westeurope --template-file main.bicep Write-Output("##vso[task.setvariable variable=bicepDeploymentOutputs;]$result") workingDirectory: Bicep failOnStandardError: true
At this point, your pipeline should be ready. Click Save & queue to save it and start a run. If we go in and examine the logs from the run and the Azure CLI step in particular, we see that the agent logged in to the Azure tenant, selected the appropriate subscription, and then executed the inline script:
So what did we create exactly? Let's take a look at the bicep file.
// Set the deployment scope
targetScope = 'subscription'

// Parameters
param location string = 'westeurope'
param resourcePrefix string = 'DevOps-CICDTesting'

// Variables
var resourceGroupName = '${resourcePrefix}-${guid(subscription().subscriptionId)}'

// Resources
resource rg 'Microsoft.Resources/resourceGroups@2021-04-01' = {
  name: resourceGroupName
  location: location
}

// Outputs
output resourceGroupName string = resourceGroupName
It is a very simple file that just creates a resource group with a random name based on the id of the subscription.
The question here is, how do we get the name of the resource group that is created by the deployment so that we can deploy additional resources down the pipeline?
This is why I've added the bicep output at the end of the template. The output from the Azure CLI command contains the values for all of the bicep outputs and this is why we are saving it to a pipeline variable in the Azure CLI step.
The following code will convert all the Bicep outputs to pipeline variables:
# Convert the output from JSON
$deploymentOutput = '$(bicepDeploymentOutputs)' | ConvertFrom-Json

# Loop through the output and create variables
foreach($output in ($deploymentOutput.properties.outputs | %{ $_.psobject.properties.name }))
{
    $name = $output
    $value = $deploymentOutput.properties.outputs.$name.value

    Write-Host ("Adding variable '" + $name + "' with value '" + $value + "'.")
    Write-Host "##vso[task.setvariable variable=$($name)]$($value)"
}
It gets the value of the pipeline variable that was set in the previous step, converts it from JSON and then parses the output part to create the pipeline variables.
To add it to the pipeline, you just have to add another step just like we did with Azure CLI, but use a Powershell type instead. We're going to go with the inline script again, and the above code. The new step should look like the below:
Save and queue your pipeline and let's examine the output from the new step.
The bicep output has been added as a pipeline variable!
You might be wondering why I didn't add this functionality to the first step and get it over with in a single step. You could do that, however, you would have to use the same language for submitting the bicep file and parsing it. I chose to add another step in order to have a more detailed flow in my pipeline and also demonstrate setting and getting a pipeline variable using Powershell.
The code of the bicep file is available in my Github repo over here. You may find the YAML file for the pipeline here.
I hope this makes your Bicep and Azure DevOps journey a bit easier!


