High Performance K8s Storage with Rook & Ceph
Modern applications are usually developed with cloud-native principles in mind, there are however some that may have particular requirements in terms of storage. When developing for containers, the need for a ReadWriteMany storage may arise, which may turn into a problem when cloud services fail to match the requirements, especially the ones related to performance.
One of the solutions to this problem is the Rook - Ceph combination. Ceph is an open-source software-defined storage platform that implements object storage on a single distributed computer cluster and provides interfaces for object-, block- and file-level storage. Rook, on the other hand, helps perform all the administrative tasks such as deployment, configuration, provisioning, scaling, and more.
A multi-zone AKS cluster is the perfect home for Rook and Ceph. The cluster is spread across three data centers and so is the data handled by Ceph. This increases the SLAs of the services running on the cluster and at the same time provides high-performance storage. A File Share on a ZRS Storage Account could also provide the same level of availability but the key point here is performance!
The below diagram shows a typical Ceph deployment in a dedicated node pool:

Each node in the pool has been assigned one or more disks that are part of Ceph.
The deployment of a Ceph cluster is pretty much straightforward, but it can turn to complicated as soon as you start adjusting your cluster. First, we need to deploy the AKS cluster and of course the required virtual network. I've created a bicep template that deploys both using modules, available here. To deploy the AKS cluster, make any changes necessary to the main bicep file and execute the deployment script. A lot of AKS and vNet settings are hardcoded to avoid making the files too complicated.
The result of the bicep deployment would be three resource groups, one that contains the vNet, one for the AKS cluster object, and one for the cluster infrastructure. Something similar to the below:

Now that the cluster has been deployed, it's time to connect using kubectl. The az aks get-credentials command will add the credentials for the managed cluster to your .kube/config file so that kubectl can use them.
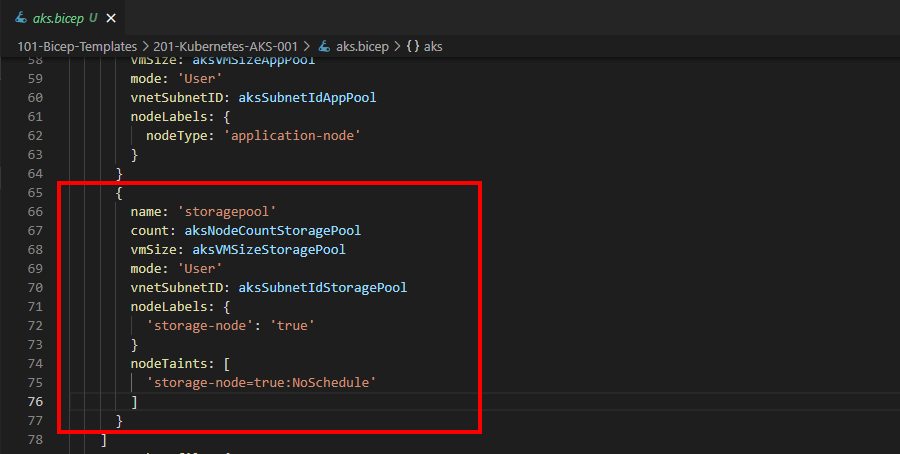
Now that we can access the cluster, it's time to deploy Ceph. The recommended approach is to have Ceph running in a dedicated node pool, so we are going to use node selectors and taints and tolerations to pin our pods to a specific node pool. In this example, I've decided to use a node selector and toleration based on the "storage-node" key that should exist on the AKS nodes, as defined in the bicep file for the cluster:
To deploy Ceph, submit the deployments in the 101-K8s-Ceph folder of the repo, in an order according to the name of the file:
- 1-common.yaml: Create common resources required for the operator and the cluster
- 2-crds.yaml: Create the necessary CRDs
- 3.1-aks-rook-operator.yaml: Deploy the Rook operator
- 3.2-hdd-storageclass.yaml: Create a storage class based on Standard_LRS disks
- 3.3-standardSsd-storageclass.yaml: Create a storage class based on StandardSSD_LRS disks
- 4-cluster.yaml: Deploy the Rook/Ceph cluster
- 5-filesystem.yaml: Create a filesystem on the cluster
- 6-rook-storage-class.yaml: Create the Rook/Ceph storage class
- 7-dashboard-service.yaml: Deploy the dashboard service
The operator, cluster and filesystem files contain the nodeAffinity and toleration statements required to restrict the pods to the appropriate nodes of the cluster.
Deploying the last file from the above list will deploy the dashboard service that provides information on the status of the cluster. If you get the services in the rook-ceph namespace, you should see something similar to the below:

To access the service, open the IP of the rook-ceph-mgr-dashboard-external-https service using your browser, always followed by the port configured in the dashboard YAML file (in our case 7000).
The page should look similar to the one below:

The default username is admin and the password can be recovered using the below command (make sure you're using the right namespace):
kubectl -n rook-ceph get secret rook-ceph-dashboard-password -o jsonpath="{['data']['password']}" | base64 --decode && echo
If the service is not responding, try changing the value of the ceph_daemon_id property in the dashboard YAML file from a to b, and apply the change.
In case you're using Premitheus, you have to ability to send all the Rook/Ceph related data there and create detailed graphs in Grafana.
The cluster has now been created and we are ready to request disk space on it. The 201-K8s-App folder of the repository contains the files to deploy a sample application. Again, use the names of the files to get the order in which you should submit the deployments:
- 1-app-namespace.yaml: Create a separate namespace for the app
- 2-app-cephfs-pvc.yaml: Request a PVC on the Ceph cluster
- 3-app-deployment.yaml: Deploy the app and mount the PVC under /home/myapp
The above files will create a namespace for our test application, and request a PVC that is going to be provisioned on the Ceph cluster and mounted in the container.
If you connect to the application pod using the kubectl exec command and check the mounted volumes, you'll notice the Ceph volume mounted under /home/myapp, just as we specified in our deployment:

This is it, we have managed to create a cluster and provision a persistent volume for our containers!
All the files used in this example are available in my GitHub repo over here. Happy coding!

