Install and Configure the OMS Linux Agent
Welcome to another article of the Azure OMS series. This time we are going to configure the OMS workspace for syslog message and linux performance counter collection and then install the OMS agent on a linux machine.
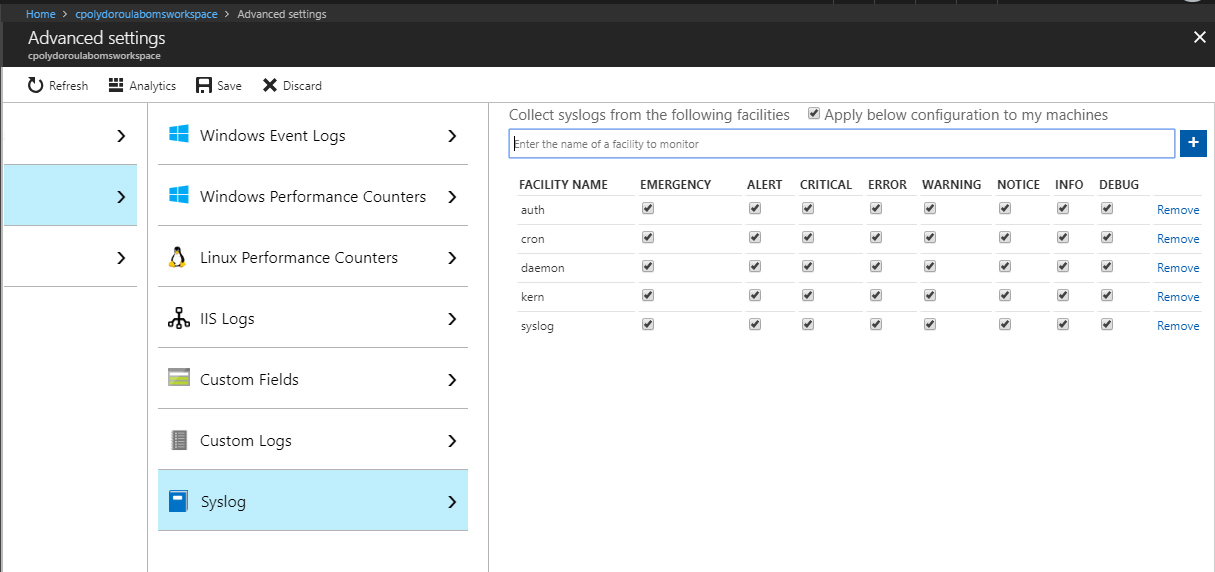
Before we start configuring the syslog machines, we have to enable syslog log collection on the OMS Workspace. Go to the "Data" blade of the "Advanced Settings" and select the "Syslog" option. There, you should enable the "Apply below configuration to my machines" option" and then add the syslog facilities to collect messages from.
Since we're installing the agent on a linux machine, why not enable the collection of performance counters as well? Go to the "Linux Performance Counters" option of the "Data" blade and enable the "Apply below configuration to my machines" option. Then, add the performance counters to collect.

Don't forget to click the save button to save the configuration!
Now that the workspace is configured, let's move on to the agent installation.
Visit the Github project for the OMS Linux Agent and get the link for the latest agent file. We are going to download this to the linux system in order to install it. If your system does not have internet access, you can download the file and copy it.
The first step is to download the file using the command:
Then, we are going to change the permissions on the file in order to execute it:
Finally, we will install the agent using the command:
In case you are using a proxy server, you can specify it in the upgrade command above or update the agent configuration by creating the file "/etc/opt/microsoft/omsagent/proxy.conf" with the url of the proxy. If you create the file, make sure that the file is readable by the agent using the following commands:
To apply the new configuration, you have to restart the agent:
Now give it some time and go back to the workspace to query for heartbeat messages:

There are heartbeat messages so the agent is able to communicate with the workspace.
Syslog messages are being collected:

Don't forget we've enabled the performance metric collection, so we should have some performance stats too:

In case you need to specify a special configuration, such as specific system or application metrics to collect, you can update the configuration files of the agent and that will overwrite the settings pushed from the workspace.
If you run into issues regarding the installation or the upgrade of the agent, more details are available on the Github page. There's also a very helpful page about troubleshooting the agent here, that contains the path to all the log and configuration files.
Have fun!
Related articles
Introduction to Azure Advanced Analytics
Configuring Log and Performance Counter collection on the OMS Workspace
Install and Configure the OMS Windows Agent
Verify the Agent Connectivity to OMS Workspace
Deploying the OMS Windows Agent using DSC
Querying OMS for Performance Data
Querying OMS for Events
Collecting IIS Log Files
Install and Configure the OMS Linux Agent
Syslog Message Collection for OMS from sources that do not support the agent
Generating Alerts on OMS
Update Management using OMS
Assessing Security using OMS
Monitoring Microsoft SQL using OMS
Monitoring Azure Activity Log using OMS
Before we start configuring the syslog machines, we have to enable syslog log collection on the OMS Workspace. Go to the "Data" blade of the "Advanced Settings" and select the "Syslog" option. There, you should enable the "Apply below configuration to my machines" option" and then add the syslog facilities to collect messages from.
Since we're installing the agent on a linux machine, why not enable the collection of performance counters as well? Go to the "Linux Performance Counters" option of the "Data" blade and enable the "Apply below configuration to my machines" option. Then, add the performance counters to collect.
Don't forget to click the save button to save the configuration!
Now that the workspace is configured, let's move on to the agent installation.
Visit the Github project for the OMS Linux Agent and get the link for the latest agent file. We are going to download this to the linux system in order to install it. If your system does not have internet access, you can download the file and copy it.
The first step is to download the file using the command:
wget https://github.com/Microsoft/OMS-Agent-for-Linux/releases/download/OMSAgent_GA_v1.4.1-45/omsagent-1.4.1-45.universal.x64.sh
Then, we are going to change the permissions on the file in order to execute it:
chmod +x omsagent-1.4.1-45.universal.x64.sh
Finally, we will install the agent using the command:
sh ./omsagent-1.1.0-28.universal.x64.sh –-upgrade -w <YOUR OMS WORKSPACE ID> -s <YOUR OMS WORKSPACE PRIMARY KEY>
In case you are using a proxy server, you can specify it in the upgrade command above or update the agent configuration by creating the file "/etc/opt/microsoft/omsagent/proxy.conf" with the url of the proxy. If you create the file, make sure that the file is readable by the agent using the following commands:
chown omsagent:omiusers /etc/opt/microsoft/omsagent/proxy.conf
chmod 600 /etc/opt/microsoft/omsagent/proxy.conf
To apply the new configuration, you have to restart the agent:
/opt/microsoft/omsagent/bin/service_control restart
Now give it some time and go back to the workspace to query for heartbeat messages:
There are heartbeat messages so the agent is able to communicate with the workspace.
Syslog messages are being collected:
In case you need to specify a special configuration, such as specific system or application metrics to collect, you can update the configuration files of the agent and that will overwrite the settings pushed from the workspace.
If you run into issues regarding the installation or the upgrade of the agent, more details are available on the Github page. There's also a very helpful page about troubleshooting the agent here, that contains the path to all the log and configuration files.
Have fun!
Related articles
Introduction to Azure Advanced Analytics
Configuring Log and Performance Counter collection on the OMS Workspace
Install and Configure the OMS Windows Agent
Verify the Agent Connectivity to OMS Workspace
Deploying the OMS Windows Agent using DSC
Querying OMS for Performance Data
Querying OMS for Events
Collecting IIS Log Files
Install and Configure the OMS Linux Agent
Syslog Message Collection for OMS from sources that do not support the agent
Generating Alerts on OMS
Update Management using OMS
Assessing Security using OMS
Monitoring Microsoft SQL using OMS
Monitoring Azure Activity Log using OMS

